WxHaskell/Quick start
A quick start with wxHaskell
This document is written to get you started quickly with writing wxHaskell applications. Further documentation can be found on the documentation page.
Note from the author: I have written this page to be in close correspondence with the yahu getting started page – first of all to make my job easier by reusing Koen Claessen's excellent example, but also since it makes an interesting comparison: we reuse many concepts of yahu, most notably properties and attributes, but as yahu is based on Tcl/TK, the applications are also typed and structured in a fundamentally different way.
Daan Leijen
Hello world in wxHaskell
Start your favorite editor and write the following program (that will show a frame with a single button that closes the frame when pressed).
module Main where
import Graphics.UI.WX

main :: IO ()
main
  = start hello

hello :: IO ()
hello
  = do f    <- frame    [text := "Hello!"]
       quit <- button f [text := "Quit", on command := close f]
       set f [layout := widget quit]
![]() Now start GHCi and run the program:
Now start GHCi and run the program:
> ghci -package wx Hello.hs
[snip]
Loading package wx ... linking ... done.
Compiling Main ( Hello.hs, interpreted )
Ok, modules loaded: Main.
*Main> main
Note: On MacOS X, you can only use the interpreter with special scripts, as you need to build MacOS X applications. Normally, the following commands will do the job:
> ghc -package wx -o hello Hello.hs
> /usr/local/wxhaskell/bin/macosx-app -v hello
> ./hello
You can read the MacOS X notes for more information on using wxHaskell on MacOS X, and how to use it from an interpreter prompt.
Types
A typical wxHaskell program imports the Graphics.UI.WX library. If you need to access specific wxWidgets functionality, you would also import the lower level Graphics.UI.WXCore library. The main function uses start to start our GUI. The function start initializes the GUI framework with the provided argument and starts the window event loop until the application quits or when all top-level windows are closed. The GUI itself is described with the following functions:
frame  ::             [Prop (Frame ())] -> IO (Frame ())
button :: Window a -> [Prop (Button ())] -> IO (Button ())

text   :: Attr (Window a) String
layout :: Attr (Frame a)  Layout

(:=)   :: Attr w a -> a -> Prop w
set    :: w -> [Prop w] -> IO ()

command:: Event (Control a) (IO ())
on     :: Event w a -> Attr w a

widget :: Window a -> Layout
Actually, some of these functions have (even) more general types – you can use the :t command in GHCi to see them.
The types Frame () and Button () denote graphical objects. These objects can have properties. When an object is created we can supply an initial list of properties but we can also set them later using set. The type of properties for frames are Prop (Frame ()) and for buttons Prop (Button ()).
Properties are created by combining attributes with values. Examples of attributes are text and layout. An attribute of type Attr w a applies to objects of type w and values of type a. Values can be assigned to attributes using the (:=) operator. You can find out more about attributes in the haddock documentation for the modules WX.Attributes and WX.Classes.
Somewhat special attributes are events. An event of type Event w a can be transformed into an attribute Attr w a using on. The value of an event attribute is normally an IO action that is executed when the event happens. Find out more about events in the haddock documentation for WX.Events and the lower level WXCore.Events
Since wxHaskell is based on an object-oriented framework, we also encode inheritance. The extra type parameter of objects encodes the inheritance relationship. When the parameter of an object is unit (), it denotes an object of that exact class. When the parameter is a type variable a, it denotes any object that is instance of that class. For example, both the frame and button functions return precisely a frame or button and use a () type parameter. However, the text attribute applies to any kind of window, including frames and buttons, and has a Window a as its argument. We can now use the text attribute for example for both frames and buttons. In wxHaskell, this works since a Frame () is actually a type synonym for Window (CFrame ()) and can thus be passed where a Window a is expected. The same hold for a Button () that is a synonym for Control (CButton ()) that is again a synonym for Window (CControl (CButton ())).
Layout
The layout of a window is specified through the layout attribute. The layout of the current program is rather terse and we will spice it up by letting the button float in the center when the window is resized. This is also a good opportunity to add a small margin around the button.
set f [layout := margin 10 (floatCentre (widget quit))]
We can also add a text label above the button that is also centered. The argument of column specifies the amount of space between the items.
set f [layout := margin 10 (column 5 [floatCentre (label "Hello")
                                     ,floatCentre (widget quit)
                                     ] )]
You can find out more about layout in the documentation for the WXCore.Layout module.
Bouncing balls
It is time for a more fun program that our Hello sample. We will write a program that lets us bounce balls on the screen!
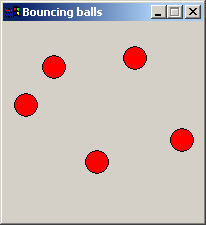
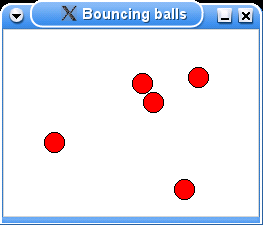
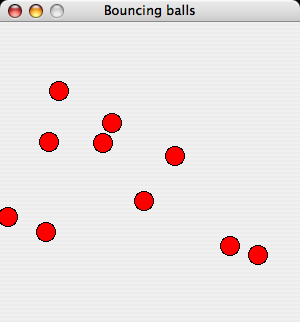
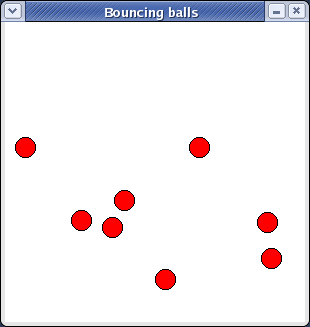
Note that the bouncing balls window is not resizeable, with the maximize box greyed out on windows. First we look at the main function in our program – ballsFrame:
module Main where
import Graphics.UI.WX

-- constants: radius of the ball, and the maximal x and y coordinates
radius, maxX, maxY :: Int
maxY = 300
maxX = 300
radius = 10

-- the max. height is at most max. y minus the radius of a ball.
maxH :: Int
maxH = maxY - radius

--the main function
main = start ballsFrame

ballsFrame
  = do -- a list of balls, where each ball is represented
       -- by a list of all future positions.
       vballs <- varCreate []

       -- create a non-user-resizable top-level (orphan) frame.
       f <- frameFixed [text := "Bouncing balls"]

       -- create a panel to draw in.
       p <- panel f [on paint := paintBalls vballs]

       -- create a timer that updates the ball positions
       t <- timer f [interval := 20, on command := nextBalls vballs p]

       -- react on user input
       set p [on click         := dropBall vballs p              -- drop ball
             ,on clickRight    := (\pt -> ballsFrame)            -- new window
             ,on (charKey 'p') := set t [enabled   :~ not]        -- pause
             ,on (charKey '-') := set t [interval :~ \i -> i*2]  -- increase interval
             ,on (charKey '+') := set t [interval :~ \i -> max 1 (i `div` 2)]
             ]

       -- put the panel in the frame, with a minimal size
       set f [layout := minsize (sz maxX maxY) $ widget p]
   where
     ...
Unlike more functional GUI libraries, wxHaskell does not provide a model for state management and uses simple mutable variables to communicate state across different event handlers. (Note: this is a concious design decision – as functional GUI interfaces are still very much a research area, we want to provide a full fledged GUI library using simple IO first, than try to build good functional interfaces on top of that). The state of the bouncing balls demo is a list of balls. Each ball is represented as a list of all its future heights. At the start of the program the list is empty (varCreate []).
Next, we use fixedFrame to create a non-resizeable window frame. A panel is created to paint the balls on and its paint handler paints the current balls in the panel. (Note: a panel has nothing to do with a Java panel: it is a widget that is normally used to place controls in as it manages control navigation keys like tab).
To animate the balls, we install a timer that advances all the balls on each timer tick and causes the panel to repaint the balls. We also install event handlers that react on the user: a mouse click causes a new ball to drop, a right click opens another frame (!), a p-key pauses the balls, and +/- increase/decrease the speed of the balls. Note how the operator (:~) applies a function to an attribute value instead of assigning one. Thus, the expression (set t [enabled :~ not]) flips the enabled state of the timer.
Finally, we specify the layout of the frame, using minsize to specifiy the minimal size of the panel and thus the size of the frame as it is not resizeable.
Painting
Let us look at the paint event handler of the panel:
    -- paint the balls
    paintBalls :: Var [[Point]] -> DC a -> Rect -> IO ()
    paintBalls vballs dc viewArea
      = do balls <- varGet vballs
           set dc [brushColor := red, brushKind := BrushSolid]
           mapM_ (drawBall dc) [p | (p:ps) <- balls]

    drawBall dc pt
      = circle dc pt radius []
A paint event handler gets two arguments: a device context (DC) to draw on and a rectangle that specifies the coordinates of the viewing area. We have supplied the first argument ourselves when setting the event handler, namely the mutable variable that holds the list of all balls.
As said, a single ball is represented as a list of all its future positions. When painting the current balls, we simple extract the head positions of all balls and draw them using drawBall. Drawing combinators like circle draw using the current pen, brush, and font of the device context. By default, a brush is transparent so we set it to a solid red brush through writing services before drawing the circles. Note that this is an optimization, we could have achieved the same effect by setting it for each circle individually: circle dc pt radius [brushKind := BrushSolid, brushColor := red]. You can read more about drawing in the documentation of the WX.Draw module.
Bouncing
The timer event handler uses nextBalls to advance all the balls to their next postion.
    -- advance all the balls to their next position
    nextBalls :: Var [[Point]] -> Panel () -> IO ()
    nextBalls vballs p
      = do varUpdate vballs (filter (not.null) . map (drop 1))
           repaint p
Updating the positions simply consists of dropping all initial positions and filtering out all empty lists. The function repaint is used to invoke the paint event handler of the panel.
When a users clicks on the panel, a new ball is created in dropBall.
    -- drop a new ball, gets mouse position as last argument
    dropBall :: Var [[Point]] -> Panel () -> Point -> IO ()
    dropBall vballs p pt
      = do varUpdate vballs (bouncing pt:)
           repaint p

    -- calculate all future positions
    bouncing (Point x y)
      = map (\h -> Point x (maxH-h)) (bounce (maxH-y) 0)

    -- calculate all future heights
    bounce h v
      | h <= 0 && v == 0 = replicate 20 0 -- keep still for 20 frames
      | h <= 0 && v  < 0 = bounce 0 ((-v)-2)
      | otherwise        = h : bounce (h+v) (v-1)
We prepend a new list of ball positions to the existing list using the varUpdate function and we repaint the panel. The new list of positions is calculated with the bouncing function that takes the position of the mouse pointer as its argument. This function uses the bounce function to calculate all future heights given an initial height and speed. Each time the ball touches the ground, it loses 2 units of speed.
Hopefully this sample inspires you to write more interesting GUI's. Don't forget to look at the samples provided with the wxHaskell documentation.


