Difference between revisions of "User:JRV"
| Line 3: | Line 3: | ||
-------------------------------------------------------------- |
-------------------------------------------------------------- |
||
| − | |||
| − | |||
Here, we develop a simple (Mac) Xcode project using Cocoa, the Interface |
Here, we develop a simple (Mac) Xcode project using Cocoa, the Interface |
||
Builder (IB). The project follows the Model-View-Control design pattern |
Builder (IB). The project follows the Model-View-Control design pattern |
||
| Line 73: | Line 71: | ||
For this test I used the same code as used in |
For this test I used the same code as used in |
||
[[Calling_Haskell_from_C|Calling Haskell from C], with some slight |
[[Calling_Haskell_from_C|Calling Haskell from C], with some slight |
||
| − | modifications. Here is the Haskell code, in a file called FibTest.hs. |
+ | modifications. Here is the Haskell code, in a file called ''FibTest.hs''. |
<haskell> |
<haskell> |
||
| Line 96: | Line 94: | ||
We compile this with ghc, viz: |
We compile this with ghc, viz: |
||
| − | $ ghc -c -O |
+ | $ ghc -c -O FibTest.hs |
This produces the following files that we will import into Xcode: |
This produces the following files that we will import into Xcode: |
||
| − | * FibTest.o |
+ | * ''FibTest.o'' |
| − | * FibTest_stub.h |
+ | * ''FibTest_stub.h'' |
| + | * ''FibTest_stub.o'' |
||
| − | * FibTest_stup.o |
||
and the following files that we won't need: |
and the following files that we won't need: |
||
| − | * FibTest_stub.c |
+ | * ''FibTest_stub.c'' |
| − | * FibTest.hi |
+ | * ''FibTest.hi'' |
== Import into Xcode project == |
== Import into Xcode project == |
||
| + | First we start an Xcode project in the usual way. I started this as a |
||
| + | plain Cocoa application. I called my application CocoaHaskellFib. |
||
| + | |||
| + | Several steps can be done in any order: |
||
| + | |||
| + | === Copy Files === |
||
| + | FibTest.o, FibTest_stub.h, and FibTest_stub.o into the folder where |
||
| + | you have saved your CocoaHaskellFib project. |
||
| + | |||
| + | Then add them to the project by Project ➝ Add To Project . |
||
| + | |||
| + | === Create application class === |
||
| + | Next, create a Cocoa Objective-C class using the Xcode menu, File→New. |
||
| + | I named mine CocoaFib. Xcode will create both an interface file (.h) and an |
||
| + | implementation file (.m). |
||
| + | |||
| + | Here is my interface file: |
||
| + | |||
| + | <pre> |
||
| + | #import <Cocoa/Cocoa.h> |
||
| + | |||
| + | |||
| + | @interface CocoaFib : NSObject { |
||
| + | IBOutlet NSTextField *integerInput; |
||
| + | IBOutlet NSTextField *fibOutput; |
||
| + | IBOutlet NSTextField *forNis; |
||
| + | |||
| + | } |
||
| + | |||
| + | -(IBAction)generate:(id)sender; |
||
| + | |||
| + | |||
| + | @end |
||
| + | </pre> |
||
| + | |||
| + | The three outlets are for the user input, fibonacci number output, and the |
||
| + | label. |
||
| + | |||
| + | And here is my implementation code: |
||
| + | |||
| + | <pre> |
||
| + | #import "CocoaFib.h" |
||
| + | #include "HsFFI.h" |
||
| + | #include "FibTest_stub.h" |
||
| + | |||
| + | @implementation CocoaFib |
||
| + | |||
| + | -(IBAction)generate:(id)sender{ |
||
| + | int i = [integerInput intValue]; |
||
| + | NSLog(@" in generate, integer input is %d\n",i ); |
||
| + | unsigned int j = fibonacci_hs(i); |
||
| + | [forNis setIntValue:i]; |
||
| + | [fibOutput setIntValue:j]; |
||
| + | |||
| + | } |
||
| + | |||
| + | |||
| + | -(void)dealloc{ |
||
| + | hs_exit(); |
||
| + | [super dealloc]; |
||
| + | } |
||
| + | |||
| + | |||
| + | @end |
||
| + | |||
| + | </pre> |
||
| + | |||
| + | Note the include lines for 1) ''hsFFI.h'', and ''FibTest_stub.h''. |
||
| + | |||
| + | Note also the ''hs_exit'' call in ''dealloc''. |
||
| + | |||
| + | === Modify main.c === |
||
== Compile and run == |
== Compile and run == |
||
== To do == |
== To do == |
||
Revision as of 18:13, 28 October 2009
I'm developing a tutorial on this page (slowly). I'm keeping it here so I can check out format, figures, etc. before putting the whole think in the Tutorial area.
Here, we develop a simple (Mac) Xcode project using Cocoa, the Interface Builder (IB). The project follows the Model-View-Control design pattern encouraged by Apple, with the View and Control entirely in Cocoa and IB, and the Model in Haskell.
This is far from fulfilling the request found in the Missing tutorials page. But it is a simple process, not requiring adding any Xcode plugins, or other extra applications.
It assumes you know something about Xcode, and something about Haskell. Its not an objective-c bridge.
Why?
Why would you want to do this? Those with Xcode/Cocoa experience will not need an explanation. On the chance that someone else is browsing here, I'll list a few things.
- Cocoa is not a language, it is a vast library of Objective-C objects.
- Cocoa covers tasks such as:
- windowing,
- displaying tables, outlines, trees,
- text fields (with built in editing),
- pretty easy printing, with pdf automatically available, and
- on and on...
- Objective-C is built on C, and is basically syntactic sugar for C.
Together with Interface Builder, one can define most user interfaces with simple drag and drop from a library of element, then connect them with your code by dragging and drop in the IB screen.
You automatically get full integration with the Mac system. You get the Mac Aqua look.
Enough said. What Cocoa doesn't provide are the tools for mathematical modeling of an application domain that Haskell provides. Parsing comes immediately to mind.
In the interest of full disclosure—I'm not an old time Mac person. I've had my Mac for two years. I only decided to learn Objective-C and Cocoa after I explored doing an application using Python and Qt, and someone in the Python community said “Objective-C is easy. Why don't you write a real Mac application”. Neither am I a Haskell expert. Although I've tinkered with Haskell for a long time (and it is probably my favorite language), I've just come back to it after a couple years away.
Overview
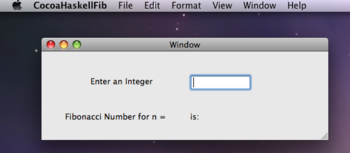
Here are screen shost of the simple application we will develop. The first shows the application widow (together with the menu automatically generated by Xcode), ready to enter a number.
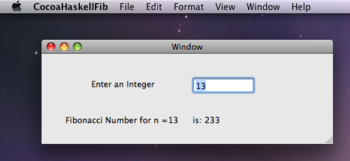
The second shows the same scene after entering a number in the text box, and pressing “return”.
The entire user interface was built in a short time using the graphical Interface Builder, by dragging text the entry box, and the labels from a library of “controls” onto the window. Notice that the labels are dynamic, in the line “Fibonacci Number for n = … is: … ”.
I won't discuss Interface Builder any further in this tutorial.
The Haskell module
For this test I used the same code as used in [[Calling_Haskell_from_C|Calling Haskell from C], with some slight modifications. Here is the Haskell code, in a file called FibTest.hs.
{-# LANGUAGE ForeignFunctionInterface #-}

module FibTest where

import Foreign.C.Types

fibonacci :: Int -> Int
fibonacci n = fibs !! n
    where fibs = 0 : 1 : zipWith (+) fibs (tail fibs)

fibonacci_hs :: CInt -> CInt
fibonacci_hs = fromIntegral . fibonacci . fromIntegral

foreign export ccall fibonacci_hs :: CInt -> CInt
We compile this with ghc, viz:
$ ghc -c -O FibTest.hs
This produces the following files that we will import into Xcode:
- FibTest.o
- FibTest_stub.h
- FibTest_stub.o
and the following files that we won't need:
- FibTest_stub.c
- FibTest.hi
Import into Xcode project
First we start an Xcode project in the usual way. I started this as a plain Cocoa application. I called my application CocoaHaskellFib.
Several steps can be done in any order:
Copy Files
FibTest.o, FibTest_stub.h, and FibTest_stub.o into the folder where you have saved your CocoaHaskellFib project.
Then add them to the project by Project ➝ Add To Project .
Create application class
Next, create a Cocoa Objective-C class using the Xcode menu, File→New. I named mine CocoaFib. Xcode will create both an interface file (.h) and an implementation file (.m).
Here is my interface file:
#import <Cocoa/Cocoa.h>


@interface CocoaFib : NSObject {
    IBOutlet NSTextField *integerInput;
    IBOutlet NSTextField *fibOutput;
    IBOutlet NSTextField *forNis;

}

-(IBAction)generate:(id)sender;


@end
The three outlets are for the user input, fibonacci number output, and the label.
And here is my implementation code:
#import "CocoaFib.h"
#include "HsFFI.h"
#include "FibTest_stub.h"

@implementation CocoaFib

-(IBAction)generate:(id)sender{
    int i = [integerInput intValue];
    NSLog(@" in generate, integer input is %d\n",i );
    unsigned int j = fibonacci_hs(i);
    [forNis setIntValue:i];
    [fibOutput setIntValue:j];

}


-(void)dealloc{
    hs_exit();
    [super dealloc];
}


@end
Note the include lines for 1) hsFFI.h, and FibTest_stub.h.
Note also the hs_exit call in dealloc.

