Difference between revisions of "Xmonad/Screenshots"
(add subsections and rearrange by layout) |
|||
| Line 3: | Line 3: | ||
'''xmonad screenshot gallery'''; images contributed by users. See the [[Xmonad/Config archive]] for the configuration files that produced some of these screenshots. |
'''xmonad screenshot gallery'''; images contributed by users. See the [[Xmonad/Config archive]] for the configuration files that produced some of these screenshots. |
||
| + | ===Misc screenshots=== |
||
| + | |||
| + | ====Environments==== |
||
<gallery> |
<gallery> |
||
| − | Image:Screen- |
+ | Image:Screen-atomb-apple.png|Apple OSX |
| + | Image:Screen-nomeata-ewhm.png|Gnome support |
||
| + | Image:Screen-sjanssen-kde-kicker.png|KDE support |
||
| + | Image:xmonad-xfce-panel.png|XFCE Panel |
||
| + | </gallery> |
||
| + | ====Etc==== |
||
| − | Image:Xmonad-screen-dons-code.png|Default wide |
||
| + | <gallery> |
||
| − | Image:droundy-config.png|Combo mode |
||
| + | Image:Xmonad-on-the-macbook.jpg|Xmonad on the macbook |
||
| − | Image:byorgey-config.png|Byorgey's dzen |
||
| − | Image: |
+ | Image:Photo-cjb-olpc.jpg|The OLPC laptop |
| + | Image:xmonad_on_tv.jpg|xmonad on TV (used as web and video station) |
||
| + | Image:Screen-triplehead-galois.jpg|Xinerama |
||
| − | Image: |
+ | Image:Xmonad-screen-modprobe.jpg|Tall, xinerama, and dzen |
| + | Image:Xmonad-screen-ta.png|Dual head, WindowNavigation |
||
| + | Image:Screen-dons-floating.png|Floating layer |
||
Image:vvv-config.png|DynamicWorkspaces |
Image:vvv-config.png|DynamicWorkspaces |
||
| + | </gallery> |
||
| − | Image:Screen-atomb-apple.png|Apple OSX |
||
| − | Image:Screen-dishes-nornagon.png|Dishes tiling |
||
| + | ====Transparency==== |
||
| − | Image:Screen-dons-4x4.png|Inc master |
||
| + | <gallery> |
||
| − | Image:Screen-dons-color-dzen.png|dzen example |
||
| + | Image:Xmonad-screen-comp-xfce.jpg|xfce + xmonad + composite + eye-burning bg |
||
| − | Image:Screen-dons-floating.png|Floating layer |
||
| − | Image:Screen- |
+ | Image:Screen-ajhager-minimal-gnome-xcompmgr.png|Gnome + xcompmgr |
| + | Image:Screen-xmonad-grid-thayer.png|Grid mode + transparency |
||
| + | Image:Xmonad-mag-grid.jpg|Magnifier + compositing |
||
| + | </gallery> |
||
| + | ====Status bars and monitors==== |
||
| − | Image:Screen-droundy-mosaic2.png|Mosaic |
||
| + | <gallery> |
||
| − | Image:Screen-ejt-spiral-dzen.png|Spiral |
||
| − | Image:Screen-gattocarlo-tabbed.png|Ion-like tabbing |
||
| − | Image:Screen-nomeata-ewhm.png|Gnome support |
||
| − | |||
| − | Image:Screen-peter-circle.png|Circle |
||
Image:Screen-rob-dzen-cpubar.png|Nice dzen |
Image:Screen-rob-dzen-cpubar.png|Nice dzen |
||
Image:Screen-rob-dzen.png|More dzen examples |
Image:Screen-rob-dzen.png|More dzen examples |
||
| − | Image: |
+ | Image:byorgey-config.png|Byorgey's dzen |
| + | Image:Screen-dons-color-dzen.png|dzen example |
||
| − | |||
| − | Image:Screen-dons-grid.jpg|Grid mode |
||
| − | Image:Screen-xj2106-three-column.png|ThreeColumn |
||
| − | Image:Screen-rickard-resize.png|ResizableTile |
||
| − | Image:Photo-cjb-olpc.jpg|The OLPC laptop |
||
Image:Screen-emertens-gray.png|dzen with bitmaps |
Image:Screen-emertens-gray.png|dzen with bitmaps |
||
Image:Screen-mauke-dzen.png|More dzen |
Image:Screen-mauke-dzen.png|More dzen |
||
| − | Image:Screen-ohmega-tab-gnome-twopane.jpg|twopane+tabbing |
||
| − | Image:Arossato-config.png|tabbed+xmobar |
||
| − | |||
Image:Screen-lobzang-monitoring.jpg|dzen monitoring |
Image:Screen-lobzang-monitoring.jpg|dzen monitoring |
||
| − | Image: |
+ | Image:rob-config.png|Shellprompt + dzen |
| − | Image:Screen-triplehead-galois.jpg|Xinerama |
||
| − | Image:xmonad_on_tv.jpg|xmonad on TV (used as web and video station) |
||
| − | Image: |
+ | Image:Arossato-config.png|tabbed+xmobar |
Image:xmonad_shellprompt_newconf.png|Dual head, dzen and ShellPrompt |
Image:xmonad_shellprompt_newconf.png|Dual head, dzen and ShellPrompt |
||
| − | Image: |
+ | Image:Xmonad-screen-emacs-dzen.png|nice emacs + dzen mode |
| + | Image:xmonad-clock.png|XMonad with clock (using Monitor extension) |
||
| − | Image:Xmonad-layout-im.png|IM layout |
||
| + | </gallery> |
||
| + | ===Layouts=== |
||
| − | Image:Xmonad-circle-comp.jpg|Circle layout + compositing |
||
| + | ====Tiled layouts==== |
||
| − | Image:Xmonad-mag-grid.jpg|Magnifier + compositing |
||
| + | <gallery> |
||
| − | Image:Xmonad-dwm-style.png|dwm-like decorations |
||
| − | Image:Xmonad-screen- |
+ | Image:Xmonad-screen-dons-code.png|Default wide |
| + | Image:dons-config.png|Default wide |
||
| + | Image:Xmonad_screen3.png|Tall vim+multitail+htop |
||
| + | Image:Screen-dons-4x4.png|Tall Inc master |
||
| − | Image: |
+ | Image:Screen-rickard-resize.png|ResizableTile |
| + | Image:Screen-dishes-nornagon.png|Dishes tiling |
||
| + | Image:Screen-ejt-spiral-dzen.png|Spiral |
||
| + | Image:Screen-xj2106-three-column.png|ThreeColumn |
||
| + | |||
| + | Image:Screen-dons-grid.jpg|Grid.Grid |
||
| + | </gallery> |
||
| + | |||
| + | ====Hinted tile layouts==== |
||
| + | <gallery> |
||
| + | Image:glguy-config.jpg|layoutHints + dualhead |
||
| + | |||
| + | </gallery> |
||
| + | |||
| + | ====Show the root layouts==== |
||
| + | <gallery> |
||
Image:Xmonad-screen-ashren-full.jpg|floating + dzen |
Image:Xmonad-screen-ashren-full.jpg|floating + dzen |
||
| + | Image:Screen-peter-circle.png|Circle |
||
| − | Image:Xmonad-screen-comp-xfce.jpg|xfce + xmonad + composite + eye-burning bg |
||
| + | Image:Xmonad-circle-comp.jpg|Circle layout + compositing |
||
| − | Image:dons-config.png|Default wide |
||
| + | </gallery> |
||
| + | ====Combo layouts==== |
||
| − | Image:xmonad-xfce-panel.png|XFCE Panel |
||
| + | <gallery> |
||
| − | Image:Xmonad-on-the-macbook.jpg|Xmonad on the macbook |
||
| + | Image:Screen-droundy-combo.png|Combined layouts |
||
| − | Image:xmonad-clock.png|XMonad with clock (using Monitor extension) |
||
| + | Image:Screen-ohmega-tab-gnome-twopane.jpg|twopane+tabbing |
||
| + | </gallery> |
||
| + | |||
| + | ====IM layouts==== |
||
| + | <gallery> |
||
| + | Image:Xmonad-layout-im.png|IM layout |
||
Image:kvirc-tall.jpeg|kvirc under Tall layout |
Image:kvirc-tall.jpeg|kvirc under Tall layout |
||
</gallery> |
</gallery> |
||
| + | ====Decorated Layouts==== |
||
| + | <gallery> |
||
| + | Image:Screen-gattocarlo-tabbed.png|Ion-like tabbing |
||
| + | Image:Xmonad-dwm-style.png|dwm-like decorations |
||
| + | </gallery> |
||
| + | |||
| + | ====Old Layouts==== |
||
| + | <gallery> |
||
| + | Image:Screen-droundy-mosaic2.png|Old Mosaic (0.6) |
||
| + | Image:droundy-config.png|Combo mode |
||
| + | </gallery> |
||
[[Category:XMonad]] |
[[Category:XMonad]] |
||
Revision as of 05:06, 27 February 2009
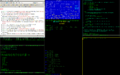
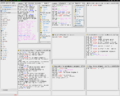
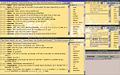
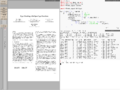
xmonad screenshot gallery; images contributed by users. See the Xmonad/Config archive for the configuration files that produced some of these screenshots.
Misc screenshots
Environments
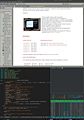
Apple OSX
Gnome support
KDE support
XFCE Panel


Etc
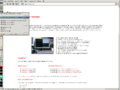
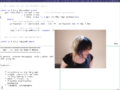
Xmonad on the macbook
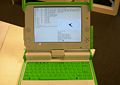
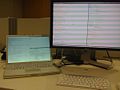
The OLPC laptop
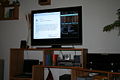
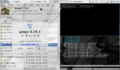
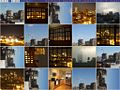
xmonad on TV (used as web and video station)
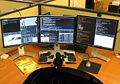
Xinerama
Tall, xinerama, and dzen
Dual head, WindowNavigation
Floating layer
DynamicWorkspaces


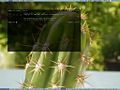
Transparency
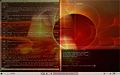
xfce + xmonad + composite + eye-burning bg
Gnome + xcompmgr
Grid mode + transparency
Magnifier + compositing


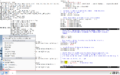
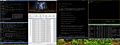
Status bars and monitors
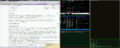
Nice dzen
More dzen examples
Byorgey's dzen
dzen example
dzen with bitmaps
More dzen

dzen monitoring

Shellprompt + dzen

tabbed+xmobar
Dual head, dzen and ShellPrompt
nice emacs + dzen mode
XMonad with clock (using Monitor extension)


Layouts
Tiled layouts
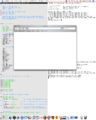
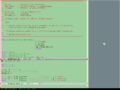
Default wide
Default wide
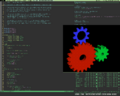
Tall vim+multitail+htop
Tall Inc master
ResizableTile
Dishes tiling
Spiral
ThreeColumn
Grid.Grid


Hinted tile layouts
layoutHints + dualhead
Show the root layouts
floating + dzen
Circle
Circle layout + compositing


Combo layouts
Combined layouts
twopane+tabbing


IM layouts
IM layout
kvirc under Tall layout


Decorated Layouts
Ion-like tabbing
dwm-like decorations


Old Layouts
Old Mosaic (0.6)
Combo mode

